Line items & costs
A purchase order’s body is a table of line items — one row per variant. This page covers the columns visible in each tab, how editing works, line-level metafields (both snapshot and write-back), constraint badges, and currency.
On this page
Section titled “On this page”- The five tabs
- Fulfillment mode per line
- Per-line columns
- Sorting by SKU and barcode
- Editing inline (Bulk Edit)
- Supplier price tiers
- Adding lines
- Snapshot metafields (Shopify → PO)
- Write-back metafields (PO → Shopify)
- Constraint badges
- Cost calculation
- Currency
- See also
The five tabs
Section titled “The five tabs”The line-item table on the PO detail page has five view tabs:
- PO — the operational columns (quantities, cost, dates, notes, constraints). The tab you edit from.
- Schedules — when a line is split across multiple supply sources (a supplier availability bucket, a production batch, manual splits), each schedule shows here with its own quantity, lead time, and fulfillment mode.
- Receipts — the receipt log for each line. One row per receipt, with the destination, fulfillment mode, and Shopify sync status.
- Inventory — current Available / On Hand / Incoming per line, pulled from Shopify.
- Sales — recent sales velocity, sell-through rate, capital tied up. Useful for sanity-checking what you’re about to order.
PO is the only tab that supports editing. The other four are read-only context.
Fulfillment mode per line
Section titled “Fulfillment mode per line”Each line carries a fulfillment mode that determines where its receipt lands:
| Mode | UI badge | What receipt does |
|---|---|---|
| Deliver to warehouse | Warehouse (green) | Standard receipt — records stock for the PO’s destination warehouse. Shopify on-hand updates through Quick Complete, Auto-sync, or manual Sync to Shopify when the destination is Shopify-backed. |
| Hold at supplier | Supplier Held (amber) | Receipt creates buyer-owned supplier-held stock; does not push to Shopify on-hand. Release later via a Supplier Stock Release. |
| Warehouse consignment | Consignment (indigo) | Stock arrives in your warehouse but ownership stays with the supplier. Does not push to Shopify on-hand. |
The mode is inherited from the supplier–variant link’s Default fulfillment mode at the time the line is created. You can override it per line in Bulk Edit.
When a line has multiple schedules with mixed fulfillment modes, the line shows a primary badge and each schedule shows its own — open the Schedules sub-tab to see the breakdown.
Per-line columns
Section titled “Per-line columns”The columns that appear depend on the active tab and whether Bulk Edit is on.
PO tab — read view
Section titled “PO tab — read view”| Column | What it shows |
|---|---|
| Image | Variant image from Shopify. |
| Product | Product title + variant title. Shopify-backed variants also show an external-link action that opens the variant in Shopify Admin; custom items and Assemblified raw materials do not show that action. |
| SKU | Variant SKU, with sorting options for Shopify SKU or supplier SKU. |
| Barcode | Variant barcode, with sorting options for Shopify barcode or supplier barcode. |
| Quantity | Ordered / confirmed / received progress with a small progress bar. |
| Constraints | ✓ / ⚠ / ✗ badges from the constraint engine. |
| Cost | Per-unit cost in the PO’s currency. |
| Landed Cost | (When Landed Cost is enabled in settings.) Per-unit landed cost including configured surcharges. |
| Actions | Row-level actions menu (edit row, delete row, etc.). |
PO tab — Bulk Edit view
Section titled “PO tab — Bulk Edit view”When you turn on Bulk Edit, several editable cells appear in place of the read-only quantity progress bar:
| Column | What you can change |
|---|---|
| Fulfillment | Per-line mode — Deliver to warehouse / Hold at supplier / Warehouse consignment. |
| Qty Ordered | What you asked for. |
| Qty Confirmed | What the supplier agreed to ship (also editable via the confirm flow). |
| Qty Received | Actual receipts (also editable via the receive dialog). |
| Qty Rejected | Lines / units the supplier refused at confirmation. |
| Qty Cancelled | Operator-decided cancellations. |
| Cost | Per-unit cost. |
| Notes | Free-text notes per line. |
Inventory tab
Section titled “Inventory tab”| Column | What it shows |
|---|---|
| Available | Shopify’s available count for this variant. |
| On Hand | Shopify’s on-hand count. |
| Incoming | Shopify’s incoming count (driven by this and any other PO/TO). |
Sales tab
Section titled “Sales tab”| Column | What it shows |
|---|---|
| Total Sales / Avg Sales | Sales over 30 / 60 / 90 days. |
| Sell-Through Rate | What share of stock is selling. |
| Sales Velocity | Daily sales rate. |
| Capital Tied Up | Estimated cost basis of current stock. |
Lines also carry supplier-specific data such as supplier SKU, supplier barcode, and supplier product name. These values come from the supplier-variant link and are visible in the line edit slider when you open a row.
Sorting by SKU and barcode
Section titled “Sorting by SKU and barcode”The SKU and Barcode headers are compact display columns, but their sort menus let you choose which identifier drives the row order:
- SKU can sort by Shopify SKU or supplier SKU.
- Barcode can sort by Shopify barcode or supplier barcode.
Use the supplier-specific sort when the document or receiving workflow needs to match the order used by your supplier. The same row order is used by PO exports and supplier-facing documents where line-item sorting is applied.
Editing inline (Bulk Edit)
Section titled “Editing inline (Bulk Edit)”Cells in the line-item table are read-only by default. To enable inline editing, click the Bulk Edit button at the top-right of the line-item card. Once active:
- The quantity cells (Ordered / Confirmed / Received / Rejected / Cancelled) become editable text inputs.
- A Notes column appears.
- The Cost cell becomes editable.
- Click Exit Edit (same button) to return to read-only mode. If you have unsaved changes, you’ll be asked to discard them first.
Bulk Edit is mutually exclusive with row selection (the checkboxes for bulk-delete clear when you enter edit mode). Each cell respects the current PO status — the lifecycle mutability matrix is the authoritative reference for what’s editable when.
Supplier price tiers
Section titled “Supplier price tiers”If the supplier has price breaks configured for the variant (a minimum quantity → unit cost table), a small tag icon appears in the line’s quantity cell. Hover it to see all tiers and which one Logistified recommends at the current ordered quantity:
- applied (green badge) — your current unit cost matches the recommended tier.
- manual override (amber badge) — you’ve kept a different unit cost than the tier recommends.
Tiers are managed per supplier on the supplier detail page (Supply tab → Price Breaks). When the line’s quantity crosses a tier threshold, the recommendation updates live in Bulk Edit; the unit cost is not auto-rewritten — it remains your decision.
Adding lines
Section titled “Adding lines”The detail page has a separate Add new line items dropdown (above the line-item table). It offers a picker, a CSV/XLSX upload, a barcode-scan flow, a custom-item creator, and — when Assemblified is connected — Virtual Materials and a Split into Raw Materials action. For the full walkthrough, see Adding line items.
Snapshot metafields (Shopify → PO)
Section titled “Snapshot metafields (Shopify → PO)”You can surface a selection of Shopify product / variant metafields on the PO line item. When the line is created, the current Shopify value is snapshotted onto the line — so even if the metafield later changes in Shopify, the PO carries the value it had at the time of creation.
- Where you configure them: Settings → Purchase Orders → Shopify Fields tab.
- Refresh: the Refresh from Shopify button re-pulls definitions when you’ve added new metafields in Shopify since last setup.
- Where they show: as additional columns on the line-item table and on the PO PDF (subject to the export template).
Use snapshot metafields for supplier-side identifiers (their batch number, warranty period, a compliance ID) you want stamped on the PO at the moment of ordering.
Write-back metafields (PO → Shopify)
Section titled “Write-back metafields (PO → Shopify)”Logistified can also write PO-derived values back into Shopify when a PO hits a trigger status you choose. For example, you can have the total ordered quantity write to a inventory.on_order metafield on the product when the PO becomes Confirmed.
- Where you configure them: Settings → Purchase Orders → Shopify Fields tab, the “Write Line Item Fields” card.
- Per-rule config: trigger status, source field (e.g. line-item quantity ordered / confirmed / pending), owner type (product or variant), target metafield key.
- Boolean rules: for Boolean Shopify metafields, configure TRUE and FALSE status lists. Logistified keeps the value TRUE while another active PO for the same product or variant is still in a TRUE status.
- Retrospective apply: when you add a new rule, you can apply it to existing matching POs in one go.
Use write-back when something downstream — a storefront badge, a 3PL integration, your own internal dashboard — needs to know what’s on order.
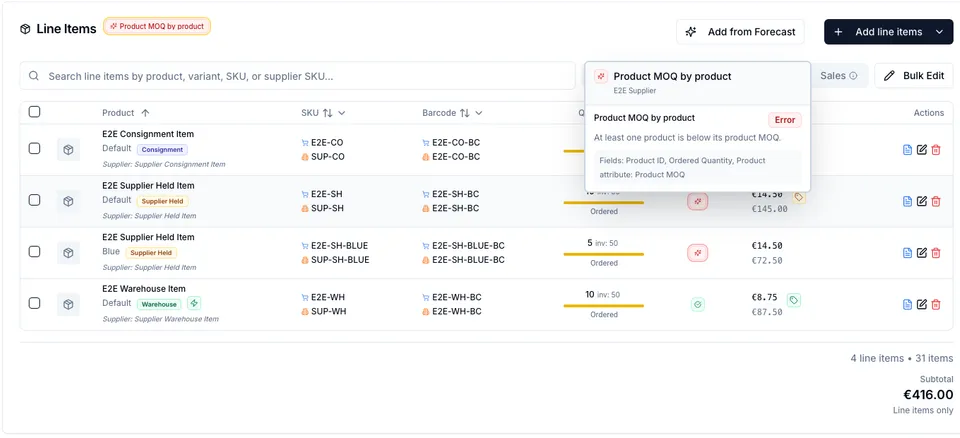
Constraint badges
Section titled “Constraint badges”When you have constraint rules configured (Elevate plan), each line can show constraint status from the saved rules:
- OK / green — the applicable checks passed.
- Warning / amber — a warning or objective rule found something to review.
- Error / red — an error-severity rule failed.
- Missing data — the rule needs a value such as Product MOQ, Unit CBM, Unit weight, Group key, or Purchase family and the value is not available for the PO context.
Hover or open the PO hints to see the rule details. The Constraint optimizer can propose additive fixes for targeted rules, but it cannot reduce/remove lines in the current Fill gaps mode.
Cost calculation
Section titled “Cost calculation”Subtotal = sum(ordered quantity × unit cost)Total = subtotal + shipping + adjustments + tax − applied creditsTotals update on every line change. The header shows subtotal, tax, shipping, applied credits, and final due. If you’ve enabled Landed Cost in settings, each line also displays its per-unit landed cost.
Currency
Section titled “Currency”A PO has one currency for its line items, inherited from the supplier at creation. Mixing currencies on a single PO’s lines isn’t supported. Payments, however, can be recorded in any currency and are converted with a per-payment exchange rate — see Payments → Currency.
See also
Section titled “See also”- Adding line items — the picker, imports, custom items, and the raw-materials split.
- Receiving stock — how the fulfillment mode determines what happens to inventory on receive.
- Supplier Stock Releases — what to do with stock from “Hold at supplier” lines after the PO is received.
- Lifecycle & statuses — what’s editable when.
- Constraint optimizer — the rule engine that drives the badges.
- Constraint Studio — configuring rules and field bindings.
- Settings — configuring snapshot and write-back metafields.