
Stock adjustments
A stock adjustment moves stock by an amount: add 12, remove 3. You never type what the shelf holds, only what changed. Logistified applies exactly that movement, records who made it, and keeps the document so you can undo it later with one click. Shopify products are updated in Shopify; virtual materials are updated in Logistified and sent to Assemblified instead.
It is the fast lane next to stock takes: open the dialog, pick your location, scan or add your items, hit Adjust now. Done in under a minute, with a barcode scanner, without touching the mouse.
On this page
Section titled “On this page”- When to use an adjustment vs. a stock take
- Creating one (the quick path)
- Choosing the location
- Adding items: scan, pick, upload
- Adding vs. removing
- Who made the adjustment
- The lifecycle, if you don’t finish in one go
- Reverting
- Document numbers
- Finding past adjustments
- AI search
- Exports and printing
- See also
When to use an adjustment vs. a stock take
Section titled “When to use an adjustment vs. a stock take”| Use a stock adjustment when… | Use a stock take when… |
|---|---|
| You know exactly what changed: 4 units damaged, a carton of 24 found, 2 given away as samples. | You don’t know what you have and need to count it. |
| You want a fast, traceable record of a movement. | You want the system to reconcile counted vs. expected and show you the discrepancies. |
| You may need to undo it cleanly later. | You’re doing a periodic or cycle count. |
Both update inventory and carry a reason from the same shared list; they differ in what you type. An adjustment asks how much changed; a stock take asks how much is there. Shopify products are sent to Shopify, while Assemblified virtual materials follow their material record instead.
Creating one (the quick path)
Section titled “Creating one (the quick path)”Inventory Management → Stock Adjustments → New adjustment.
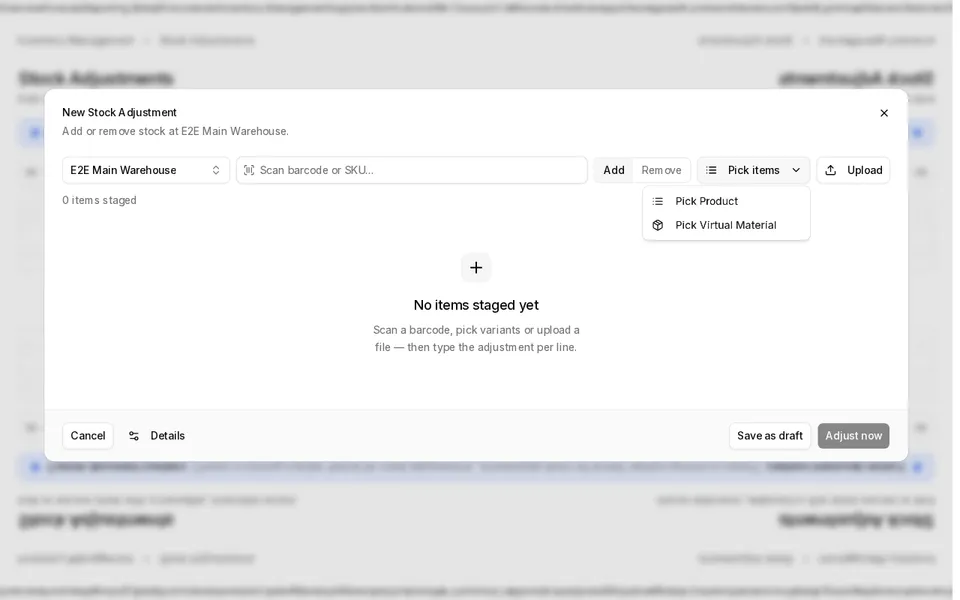
The dialog opens straight onto the item list: location at the top, the scan box ready, your items underneath.
- Pick your location. See below: one click, or nothing at all if your store has a single location.
- Add your items and set the amounts. Scan, pick or upload them (see below), then set how much each one moved. Every row shows what’s on hand at that location and what the adjustment leaves behind, so a mistake is visible before you commit.
- Finish. Either:
- Adjust now: creates the adjustment and applies it immediately. You land on the document with everything already applied.
- Save as draft: creates the document with your lines and sends nothing. Come back later, edit it, and apply when you’re ready.
Everything optional (reason, a name, notes, and Adjusted by) sits behind the Details button, one click away. It never stands between you and the finish: Save as draft and Adjust now are on both screens, and Adjusted by is already filled in with your Shopify staff name.
Choosing the location
Section titled “Choosing the location”Each of your locations is a button in the middle of the empty dialog, so starting an adjustment is a single click. The location you used last is highlighted in blue and comes first. A store with one location never sees the question; it’s already chosen. If you have more than eight locations, the first eight are shown as buttons and the rest are a search away in the Location box at the top.
Adding items: scan, pick, upload
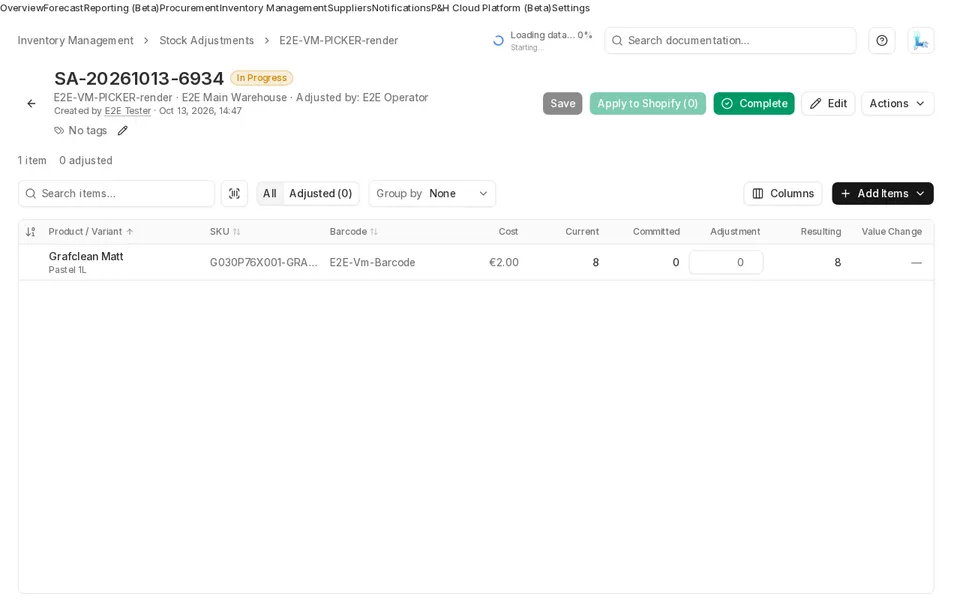
Section titled “Adding items: scan, pick, upload”Three ways, mix them freely in one adjustment. In the dialog all three are on the toolbar above the list: the scan box is always live (just scan, no clicking first) with Pick items and Upload beside it. Pick items opens a choice between Pick Product and Pick Virtual Material. On the saved document, the same virtual-material choice lives under Add items.
| Way | What it’s for |
|---|---|
| Pick items | Use Pick Product for Shopify products or Pick Virtual Material for Assemblified materials. Search by product, variant or SKU and select several at once. |
| Scan items | Scan barcodes or SKUs. Capitalization does not matter; if the same code is one item’s SKU and another item’s barcode, the SKU wins. Every scan moves that row by one; scan the same box five times and the row reads 5. In the dialog the scan box already has your cursor, so a scanner works the moment it opens. |
| Upload | A CSV / XLSX with a SKU (or barcode) column and a signed adjustment column. Same import flow as everywhere else in Logistified, including the column-mapping step. |
Adding the same item twice never creates a second row. Picking an item starts its adjustment at 0; scan it twice in Add mode and that row becomes +2. Uploading a file over items already on the document is the one place you choose: the import step asks whether the uploaded amounts should replace or be added to what’s already there.
Virtual materials must already be stocked at the adjustment’s location. A material with 0 on hand is valid; one with no stock record at that location is refused. If the check or save fails, the picker stays open with your selection intact so you can correct it or retry. Items that were already added during a partial attempt are skipped on the retry.
Adding vs. removing
Section titled “Adding vs. removing”In the dialog, every row ends with its own Add | Remove switch, and the amount you type is a plain number; the switch decides the direction. Type 5 on a row set to Remove and it becomes −5; the number turns green when stock is coming in and red when it’s going out, so a wrong direction is visible down the whole list. Flip the switch and the number flips with it, which is the one-click fix for a row you set the wrong way round. Typing a minus yourself still works and simply flips the switch for you.
Scanning has its own Add / Remove toggle next to the scan box: leave it on Add to count rows up, flip it to Remove to count them down, and every scan moves the row it matches by one. It also sets the direction new rows start with, so for a batch of write-offs, flip it to Remove once, pick your ten items, and type ten plain numbers.
On the document itself the amount is a plain signed number: 12 adds twelve, −3 removes three.
Who made the adjustment
Section titled “Who made the adjustment”Every adjustment records an operator: the Adjusted by field, prefilled from your Shopify staff account and editable before you save. It appears in the list, on the document, in the PDF and in exports, so “who removed those 40 units?” always has an answer.
Adjustments made by a connected AI assistant or an API key record that connection’s name instead (for example Claude Desktop), so automated changes are as attributable as manual ones.
The lifecycle, if you don’t finish in one go
Section titled “The lifecycle, if you don’t finish in one go”A saved draft follows the same path as a stock take:
| Status | What it means |
|---|---|
| Draft | Created, no items yet. |
| In Progress | Has items; not fully applied yet. |
| Completed | Every movement was applied. |
| Cancelled | Abandoned. Terminal. |
Adjust now walks it to Completed for you. If a line cannot be applied (for example, a deleted variant or an item not stocked at that location), the document stays In Progress with the reason on the row, and applying again only retries what didn’t land. Nothing is ever applied twice.
Lines you’ve applied are marked Synced. If you change the amount on an applied line, it flips to Re-sync and the next apply sends only the difference.
Reverting
Section titled “Reverting”An adjustment can be undone in one action: Actions → Revert stock adjustment.
Reverting does not erase anything. It creates a new adjustment that is the exact opposite of what actually reached inventory, links the two documents together, and (if you leave Apply immediately on) applies it straight away. Your history keeps both records: what happened, and what undid it.
- The two documents link both ways: the original shows Reverted by SA-…, the new one shows Reverts SA-….
- If you delete the revert before applying it, the original becomes revertible again.
- A revert can itself be reverted.
Revert is unavailable (with the reason in a tooltip) when there is nothing to undo: the adjustment was never applied, it still has unpushed lines (apply or clear them first), it’s cancelled, or it has already been reverted.
Document numbers
Section titled “Document numbers”Adjustments get their own running number, separate from stock takes. Until you choose a format they look like SA-20260817-4821. Turn on a clean sequence (SA-000001, SA-000002, …) at Settings → Document numbering → Stock adjustments; a note bar on the list links you there until you do.
Finding past adjustments
Section titled “Finding past adjustments”The adjustments list has a search box, an Add filter popover, and a preset switcher, with a removable chip for each active filter. Filters available: status, location, reason, vendor, Created by, and a date range; the date filter has its own column picker, so you can point it at the created, completed, cancelled, or applied date. Its quick choices are Today, Last 7 days, Last 30 days, Last 365 days, This month, and Last month; Last 365 days includes today and the preceding 364 calendar days. On narrower windows, the calendar shows one month at a time; use the arrows to move between months. The search box matches the adjustment’s number, name, operator, product, or SKU.
Created by is its own thing, separate from Adjusted by: the creator is the Shopify staff account that raised the document, while Adjusted by is the free-text operator name you can edit. Both have their own column on the list, and the creator also appears as a line under the title on the adjustment itself.
Save a filter set (including the search term) as a named preset shared by the whole shop; every operator sees the same saved presets, not a per-browser default. Star one preset to make it the shop default, applied automatically the next time anyone opens the list with a plain, unfiltered link. Clear all drops every filter, the search term, and the active preset in one step (the Adjusted by operator, when it’s set on the URL, isn’t part of this and isn’t cleared by it; see Who made the adjustment).
AI search
Section titled “AI search”You can also describe the adjustments you want. Click into the search box and press Tab (or click the light-blue Tab: try AI search badge; on a phone or tablet, tap AI search), type a request in English and press Enter. A preview shows the filters it understood (status, location, reason, vendor (the brand of the products adjusted), Created by, tags, and a date period on the created, completed, cancelled or applied date), and nothing changes until you click Apply. For example:
- “adjustments for damaged goods at the Munich outlet”
- “adjustments applied this month”
If you don’t see the badge, AI search isn’t enabled for your shop yet. See Find orders with AI search for the full walkthrough.
Exports and printing
Section titled “Exports and printing”- Export (from the list or a single adjustment) offers Movements (one row per line with the amount, unit cost and value change) and Adjustment level (one row per adjustment with its totals, reason, operator, net quantity change and both revert links). CSV or XLSX, columns from a template you control.
- Print PDF produces a Stock Adjustment Report with the operator, reason and every movement.
See also
Section titled “See also”- Stock takes: count what you have instead of stating what changed.
- Inventory levels: what an adjustment updates.
- Settings → Data export templates: column presets used by the exports.
- Guides → Make a stock adjustment: the short walkthrough.
- Guides → Find orders with AI search: describe the adjustments you want instead of picking filters.